Skinny Zucchini Boats

Skinny Zucchini Boats5

My favorite vegetable of all-time! Such a versatile little thing… So much to create and experiment with! It was about time to get more creative and make these beautiful zucchini boats… Stuffed… Stuffed with cottage cheese filling and freshly prepared Marinara sauce! Oh yeah… you’re in for a treat!

Like I always say.. very easy and quick to prepare and perfect as a side or main course!

There are two parts to this dish – 1> filling and 2>fresh marinara sauce

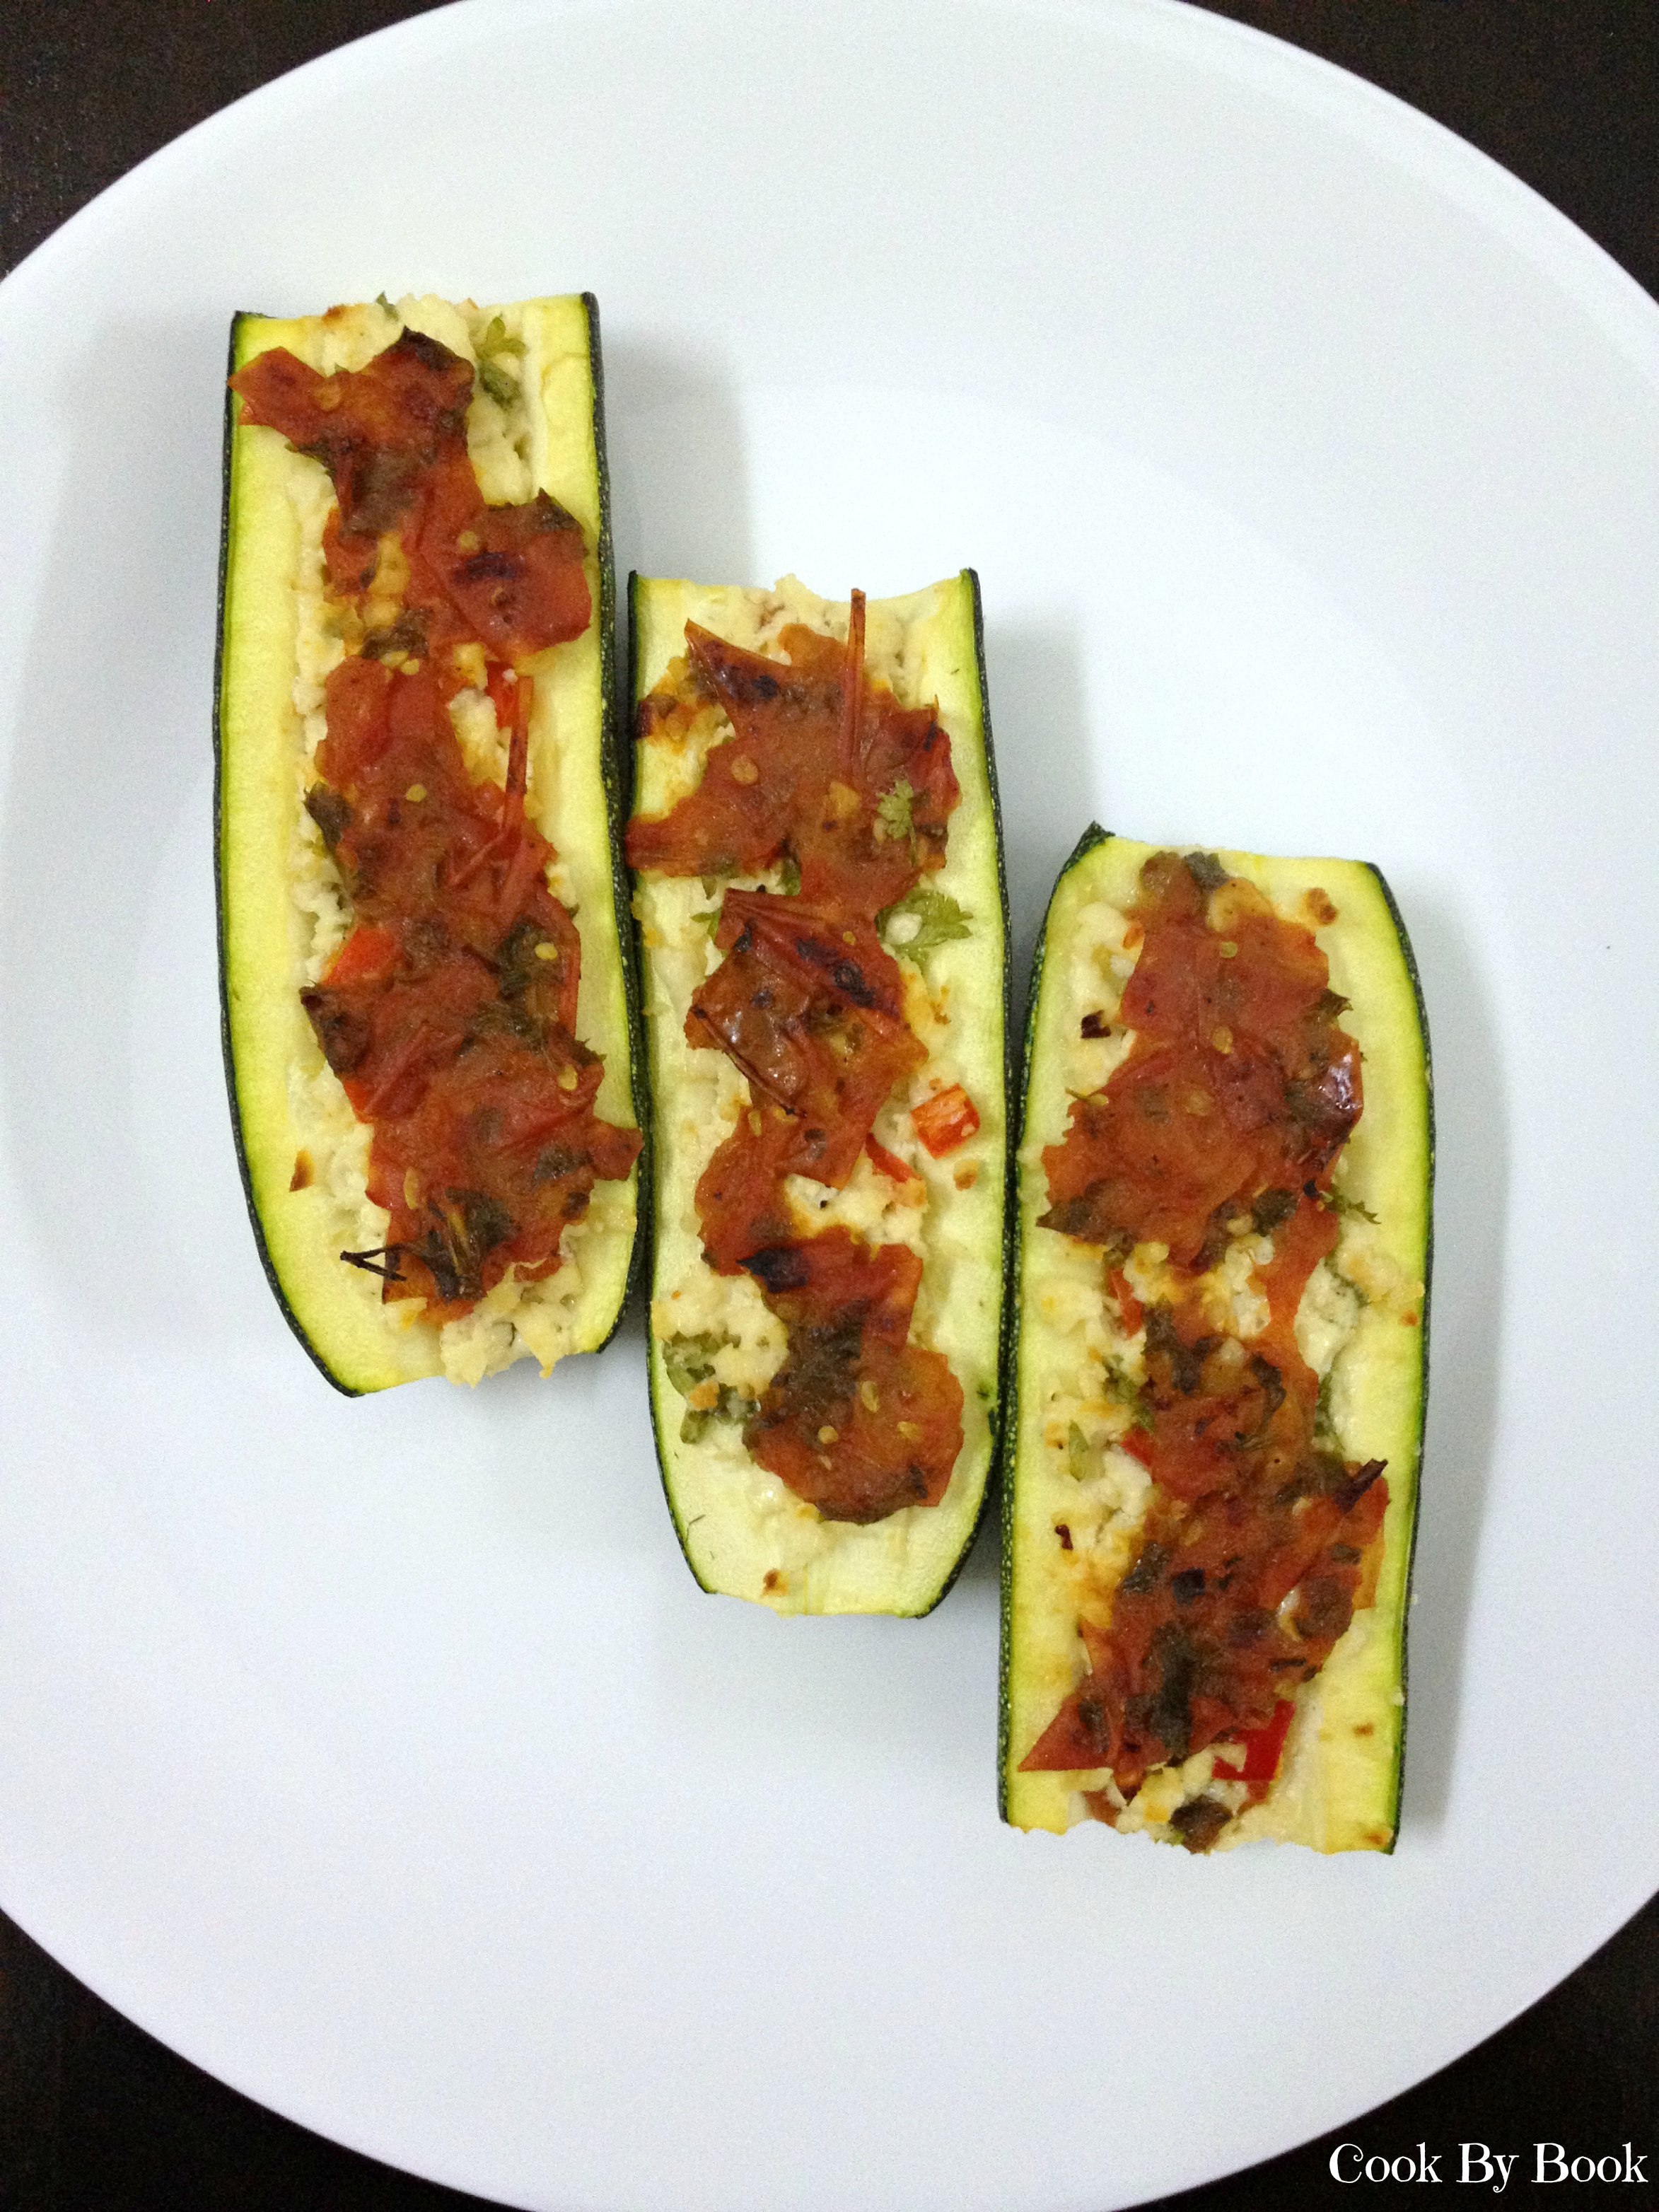
Shucking the zucchini is lots of fun! If using medium sized zucchini then you can part them in middle and then divide them in half, lengthwise. If using smaller zucchinis then just divide them lengthwise. After this zucchinis are hollowed-out and stuffed with the prepared filling and topped with Marinara sauce. All the elements here are raw so it all comes together in no time! Bake them and they are ready to be gobbled!

Eat as many as you want as they are pretty light and low-cal! 😉Skinny Zucchini Boats1Skinny Zucchini Boats2

Skinny Zucchini Boats3Skinny Zucchini Boats4

Skinny Zucchini Boats

Yields: 8 zucchini boats | Serves: 2 for lunch/dinner and 4 as side-dish

Ingredients:

Marinara Sauce:

  • 4-5 tomatoes, blanched, skin peeled and chopped
  • 1 tsp olive oil
  • 2 cloves garlic, smashed and finely chopped
  • 1 large bay leaf
  • 1/2 tsp red chili flakes
  • 1 tsp oregano
  • 2 Tbsp fresh parsley, finely chopped
  • salt and pepper to taste

Skinny Zucchini Boats:

  • 2 medium zucchinis, halved and cut lengthwise
  • 100 gm cottage cheese, grated
  • 1 small red bell pepper, finely chopped
  • 1 Tbsp fresh parsley, diced
  • 1/2 tsp red chili flakes
  • salt and pepper, to taste

Directions:

For Marinara sauce: 

  • In a small pot, heat olive oil over medium heat and saute garlic. Be careful not to burn.
  • Add tomatoes, bay leaf, chili flakes, oregano, salt and pepper. Stir and reduce heat to low. Cover and let simmer for about 10 minutes.
  • Remove the bay leaf and mash tomatoes nicely. Remove from heat and stir in parsley.

For Skinny Zucchini Boats:

  • Preheat oven to 200 C/400 F. After cutting zucchini in half lengthwise, use a spoon or melon baller to scoop out flesh, leaving 1/4″ thick. Discard the flesh or use it in your next veggie recipe.
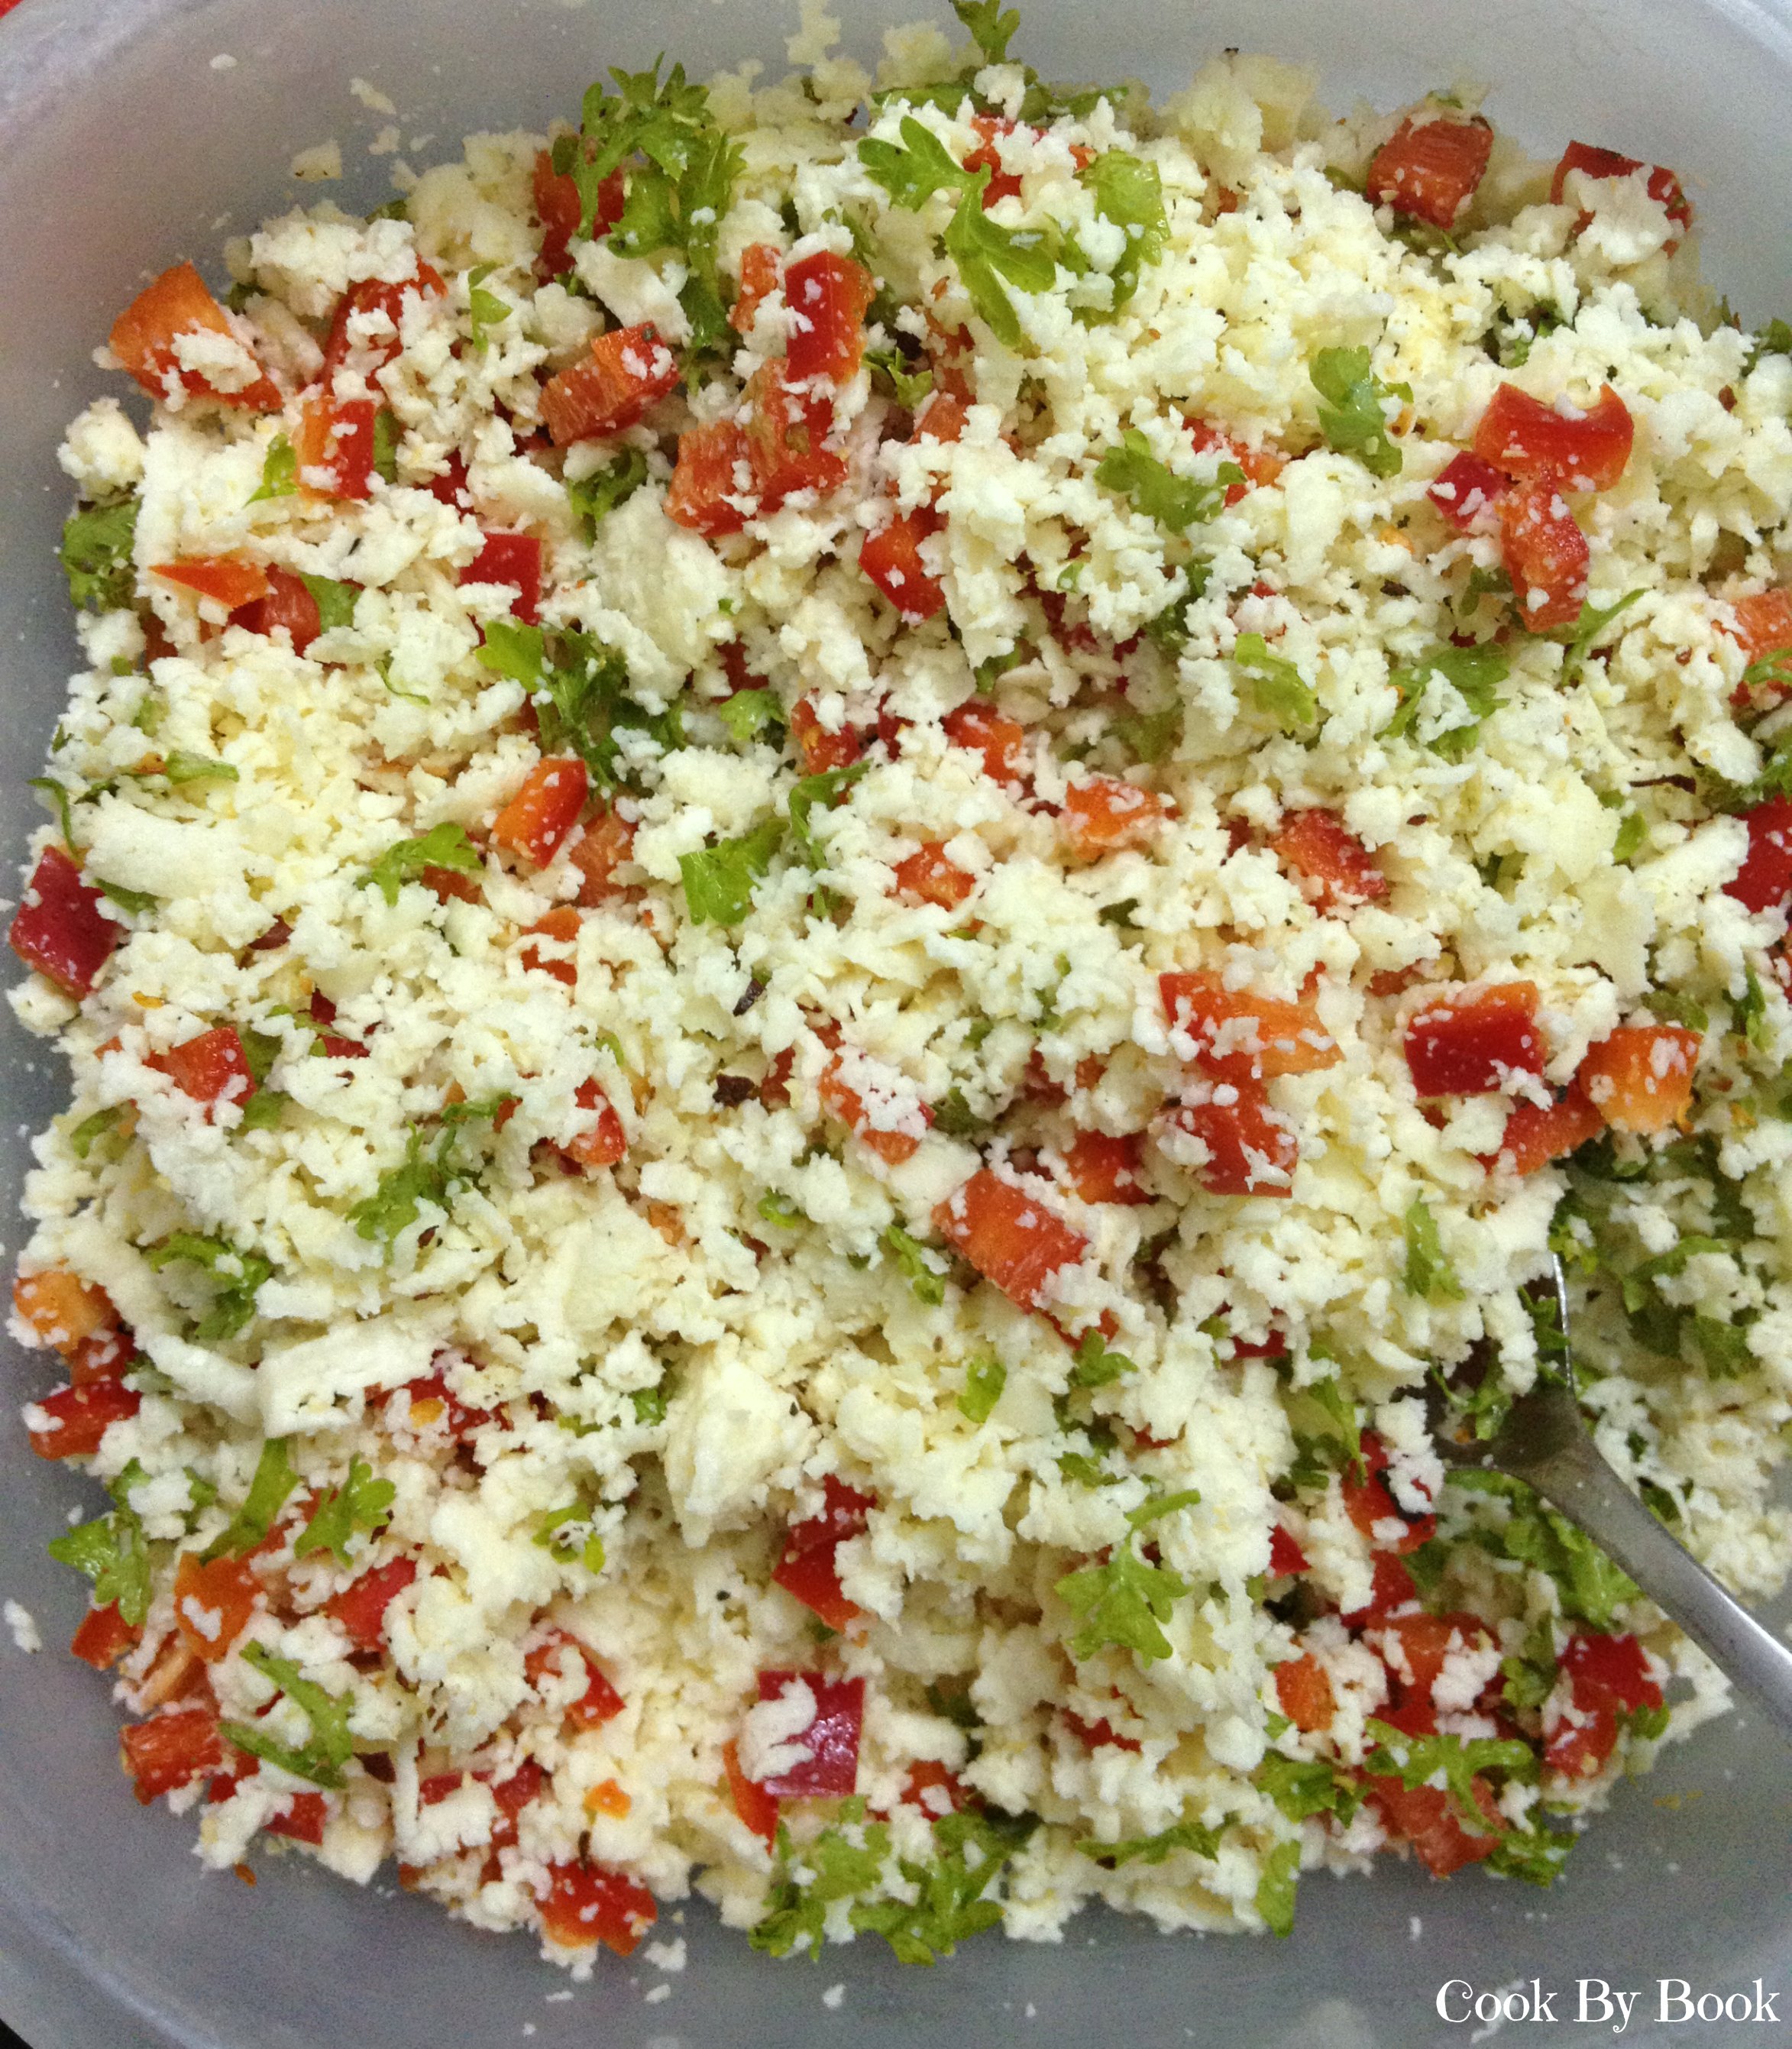
  • In a small bowl, mix together cottage cheese, red bell pepper, parsley, chilli flakes, salt and pepper.
  • Place scooped out side up on the baking sheet and season it with salt and pepper. With spoon, fill each hollowed-out zucchini with about 2 Tbsp of cottage cheese stuffing and press firmly. Top it generously with marinara sauce.
  • Bake for 25 minutes or till zucchini is cooked through. Serve hot!

*Cheese-lovers don’t be disappointed! ~ Top zucchini boats with mix of grated Parmesan and Mozzarella cheese before baking. Cover with foil and bake for 30 minutes or till cheese melts completely.
*Basil-lovers can replace parsley with basil leaves, both in filling and Marinara sauce.


Share this recipe:

Vanilla Buttermilk Eggless Sponge Cake

Vanilla Buttermilk Eggless Sponge-2

After the last post of SugarPlum Cinnamon Buttermilk Cake, many people wanted an eggless sponge cake. I knew I had to bake one immediately… hence this post.

This recipe is from my initial baking days… very simple and easy to make even for beginners… so naturally it never got posted on the blog. Not bragging but I thought it to be too simple to be posted here. But trust me, it is every bit delicious! This is my go-to recipe while baking for non egg-eaters and it has turned out perfect every single time so it is tried, tested and tasted recipe in a true sense!

Use this as your basic cake recipe and add any other ingredients you like to it. Cinnamon, chocolate, lemon… anything! Sky is truly a limit. Use any other fruit you like or even better, make it tropical (pineapple and coconut, anyone?) style! Getting ideas?! ?

This eggless sponge is moist, has tight crumb and relatively flat top which makes it perfect for a multi-layer cake for birthdays or for any other occasion. In past, I have successfully doubled and tripled this eggless sponge recipe to make a 2 or 3-layer celebratory cake. For frosting ideas and recipes, read the recipe notes at the end of this post.

Vanilla Buttermilk Eggless Sponge Cake-1

Previously I have always used fresh strawberries for this eggless sponge as seen in the picture above. This time I had Kiwi fruit on hand so I decided it was time for a change. I am not a fan of baked Kiwi fruit so I refrained from adding fruit pieces to the batter which I sometimes do with strawberries but if you have no such qualms then go ahead.

It is perfect for eating any time of the day!

Yup, even for breakfast!

It has yogurt and fruit! Totally acceptable, right?! 😉

Kiwi Buttermilk Cake - Eggless1


Recipe adapted from here

Print Recipe
Vanilla Buttermilk Sponge Cake ~ Eggless
Cuisine American
Prep Time 10 minutes
Cook Time 30 minutes
Servings
slices
Ingredients
Topping
Cuisine American
Prep Time 10 minutes
Cook Time 30 minutes
Servings
slices
Ingredients
Topping
Instructions
  1. Preheat the oven to 180°C/350°F. Spray a 6 or 8-inch baking dish with vegetable oil and line the bottom with parchment paper.
  2. Sift together flour, baking powder, baking soda and salt in a bowl.
  3. In a separate bowl, cream together butter, oil and sugar with electric mixer or hand whisk. Whisk in vanilla extract.
  4. Using rubber spatula, gently stir in dry ingredients to the wet ingredients in 2-parts alternating with yogurt/buttermilk, ending with dry ingredients. Do not over-mix the batter.
  5. Spoon the batter in a baking dish and smooth out the surface with the back of spoon. Top with Kiwi/strawberry slices and sprinkle with sugar. Bake for 25-30 minutes or till the toothpick inserted in the center comes out clean.
Recipe Notes

*Stays fresh for 3-4 days if refrigerated in an airtight container.
*Want to add fruit within the cake batter instead on top? Mix together about 1/2 generous cup of chopped fruit and 1 Tbsp flour, fold into the cake batter.
*You may double/triple/quadruple the recipe to make layers for a multi-layered cake. Use vanilla bean buttercream, fresh strawberry cream cheese frosting, lemon cream cheese frosting or coconut buttercream frosting recipe to decorate.

Share this recipe:

Skinny Beetroot Hummus

Skinny Beetroot Hummus2

I’m a huge fan of hummus and can’t get enough! I can have it for all three meals of my day. Oh-yeah! 🙂

A quick, low-fat, protein-packed and super-easy home-made hummus! A pink hummus! As a dear friend quoted ‘If I could I would cover my life in pink!’ I would too!

The hummus gets its pink color from the addition of a boiled beetroot. If you are not a big fan of beetroot, still add it as I promise you won’t be able to taste it at all! It’s sooo good!!!

I stirred in lemon zest to finished hummus and it went a notch up! It became truly Ah-mah-‘zing’ actually!!!

Cheese-lovers can add Parmesan cheese (to be added during blending) to this lovely appetizer but I wanted to keep it low-fat so I skipped it.

So let’s blend-blend!

Skinny Beetroot Hummus1

Skinny Beetroot Hummus

Serves: 4 | Stays fresh for 3-4 days, refrigerated in airtight container

Ingredients:

  • 1 cup chickpeas, soaked overnight, boiled and drained
  • 1 medium beetroot, peeled, boiled and roughly chopped
  • 2 cloves garlic, crushed
  • 1 Tbsp Tahini
  • 3 Tbsp extra virgin olive oil
  • 2 Tbsp lemon juice
  • salt, to taste
  • zest from 1 lemon

Directions:

Add boiled chickpeas to the blender jar. Add garlic cloves, tahini and 2 Tbsp olive oil to jar and blend.

Add 1 Tbsp lemon juice and salt and blend again.

Add beetroot pieces and remaining lemon juice and olive oil to blender and blend till smooth and creamy.

Stir in lemon zest, transfer to a serving bowl and serve.

*Soak chickpeas overnight. If short on time, soak them in just boiled water for at least 3-4 hrs. It will take a bit long to cook but will do the job.
*I used pressure cooker for boiling chickpeas and beetroot both. I boiled them separately.

Accompaniment options: Pita bread, Nachos or Tortilla chips, My Skinny Carrot Sticks, veggie crudites or simply a spread on toast! Sky is the limit actually!! 😉

Share this recipe:

Skinny Carrot Sticks

Skinny Carrot Sticks2

Healthy snacking… It should be a way of life. Little indulgences are okay during breakfast or lunch time. But not acceptable during evening bites. This topic is written and read and discussed over and over again.. But who follows all that anyway?!

I have my weaknesses… I know them… So let’s go over the culprits. I love french fries.. I adore potato wedges.. & oh.. forgot potato chips.. So the common thread is potato! Yup.. I love my potato ~ deep fried! Nothing beats that. But after trying the baked versions of all these potato treats, I’m sold! They taste every bit as delicious and not one bit skinny! So they have become party favorites at our house.. I still indulge in these fried treats when it is junk food day which does not happen regularly so it’s fine.

Skinny Carrot Sticks3

So on a lazy Sunday afternoon, instead of my favorite baked potatoes, I made these carrot sticks. Really crispy, low-fat and dee-lish! Carrot sticks covered with dry thyme, salt, black pepper & onion powder and thankfully not smothered in too much oil! Just a bit… Yaay!! 😀

And yeah, going along the skinny way I served them with light mayonnaise.

Feel free to use potatoes or sweet potatoes instead of carrots.

Skinny Carrot Sticks1

Skinny Carrot Sticks

Serves: 2 or 1 😉

Ingredients:

  • 300 gm carrots, peeled and cut into 1-cm thick fries (about 4 medium sized)
  • 1/2 Tbsp olive oil
  • 1/2 Tbsp dry thyme
  • 1/2 tsp onion powder
  • freshly cracked black pepper, a pinch
  • salt, to taste
  • 2 Tbsp light mayonnaise (I used American Garden’s)

Directions:

Preheat the oven to 200 C/400 F. Toss all the ingredients together in a large bowl. Spread in a single layer on a baking sheet lined with parchment paper and bake for 20-25 minutes, tossing and turning halfway.

Serve them hot with mayonnaise.

*For even crispier sticks, throw in 1/2 Tbsp bread crumbs also to the mix.
*Feel free to add whatever you like to your mayonnaise.
*Feel free to use potatoes or sweet potatoes instead of carrots.

Share this recipe:

SugarPlum Cinnamon Buttermilk Cake

SugarPlum Cinnamon Buttermilk Cake1

Happy Half New Year Everyone!!

You must be thinking who remembers or celebrates that! Neither do I! But got reminded of it on through WhattsApp messenger. Guys, we are in the middle of the year, we have finished 183 days of the year already! Another 182 days to go! Today is 184th day.. I know I am a day late in wishing you all but if none of you even remembered it then it doesn’t count, right? 😉

I can’t believe how half the year has already passed by and time has engulfed us in its speed that we can barely keep up! I have not even started ticking my to-do list of this year. So I really need to brace myself as soon it will be Christmas even before we know it!

And its finally raining in Bangalore!! Not as much as I would like but hey I am not complaining. Bangalore marked half of the year by gracing us with rain yesterday evening. I was so happy that I had to do a little dance, listen to my fave songs and bake! With cinnamon!!! I love how the aroma of cinnamon fills the house and this smell mixed with the smell of rain is almost heavenly!

SugarPlum Cinnamon Buttermilk Cake2SugarPlum Cinnamon Buttermilk Cake3

I had bought almost 2 kg of sugarplums from my regular supermarket as it was on sale! Half of them were super-ripe and sweet so it goes without saying that we enjoyed them just like that. Rest of them were quite sour and tart for which hubby & I both have got pretty low tolerance so I decided to use them in a cake.. A topping for a simple cinnamon buttermilk cake! They look like red jewels… So adorable it makes my heart sing! Plus, all the tartness is masked by the sweetness of the cake.

SugarPlum Cinnamon Buttermilk Cake4SugarPlum Cinnamon Buttermilk Cake5

As it was raining, there was music and I was in a mood to dance while I bake, I decided to whip the batter with hand. It was so therapeutic!!! No mixer is required for this cake and only 2 dirty bowls! Complete win-win.. 🙂

The plums I had were quite firm so slicing slivers from them was not so messy and quite pleasing experience. Be sure to use a sharp knife for this. Each plum will give around 8 slices.

Perfect as a coffee/tea time cake & perfect as a dessert served with vanilla custard or sweetened whipped cream or vanilla ice-cream!

Oh, did I mention it is healthy?? 😉

Enjoy!

SugarPlum Cinnamon Buttermilk Cake6

SugarPlum Cinnamon Buttermilk Cake

Adapted from Super Natural Every Day – Heidi Swanson

Prep Time: 25 min | Baking time: 30 min | Serves: 12

Ingredients:

  • 2 and 1/2 cup whole wheat flour
  • 1 Tbsp baking powder
  • 1 Tbsp ground cinnamon
  • 1/2 cup caster sugar
  • 1/2 tsp salt
  • 2 large eggs
  • 1 and 1/2 cup buttermilk
  • 1/4 cup butter, melted and cooled
  • zest of 1 very large lemon
  • 6-8 sugarplums, thinly slivered (ripe yet firm)
  • 3 Tbsp granulated white sugar

Directions:

  1. Preheat oven to 200 C/400 F. Grease an 11″ tart pan or quiche dish.
  2. Sift together flour, baking powder, cinnamon, sugar and salt in a bowl. In a separate large bowl, whisk together the eggs, buttermilk, melted butter and lemon zest.
  3. Add dry ingredients into wet ingredients and mix until all the flour pockets disappear and the batter is just combined.
  4. Spoon batter into greased pan, tapping the pan over the working station. Smooth the batter with back of your spoon, spreading it out towards the edges. Arrange plums in a circular pattern or just scatter them around. Top with granulated white sugar evenly.
  5. Bake for 30 minutes or till the toothpick inserted in the center comes out clean. Serve warm with a dusting of icing sugar or vanilla custard or sweetened whipped cream or vanilla ice-cream.
Share this recipe: