Category: Fall

Christmas Fruit Cake

Christmas Fruit Cake1


This was going to be my first year baking Christmas cake. I was super-excited! Really! I prepared the fruit-soak almost 3 weeks in advance which is major for me as I have never been much of a planner! And of course for the recipe as the liqueur gets a chance to marry the fruit 😉

I started hunting for recipes months ago. And I got to know that Christmas cakes have got such bad reputation! They are quite infamous for being boring, dry, overly sweet and like a hard brick that I was fairly skeptical at even attempting to make it at home. It deterred my enthusiasm quite a bit. Hence it was a pretty daunting task zeroing on THE recipe. But finally chanced upon the one which spoke to me and boy, hold your breath people, I have found THE recipe for your Christmas cake this year!


Christmas Fruit Cake4
Assorted fruits & nuts mixed in before pouring the liquere


Christmas Fruit Cake2


The recipe is fairly simple. As I told you before, the fruit-mix needs to be soaked in advance. Then a night before making the cake, just simmer few ingredients. This step guarantees moister and softer cake as the fruit-mix get a chance to soften up a bit. Dump all the other ingredients into this mixture. And that’s it! You know I have a thing for simple and quick recipes and this was just that! Pop the cakes to be baked in the oven and forget about them for an hour. Do whatever you do in the meanwhile like get lost on Pinterest (so addicting!) or doing your nails (perfect utilization of time!) and they’ll be ready! I did a taste from my mini loaf and the cake was supremely moist! Success!!


Christmas Fruit Cake3


Be sure to wrap the cakes (tightly) soon (when they are still quite warm.. almost hot) after removing from moulds and showering them with liqueur, to avoid anymore direct contact with the atmosphere. This will ensure that the moisture gets locked. If you want more liqueur then feed the cakes every 6-7 days with more liqueur (till ready to eat) and wrap them back. They taste best after several days/weeks of aging so be patient! 🙂

Happy Baking!!
xx

Christmas Fruit Cake

Recipe barely adapted from Rasa Malaysia

Fruit-Mix: To be prepared 2-3 weeks in advance or at least 48 hrs before

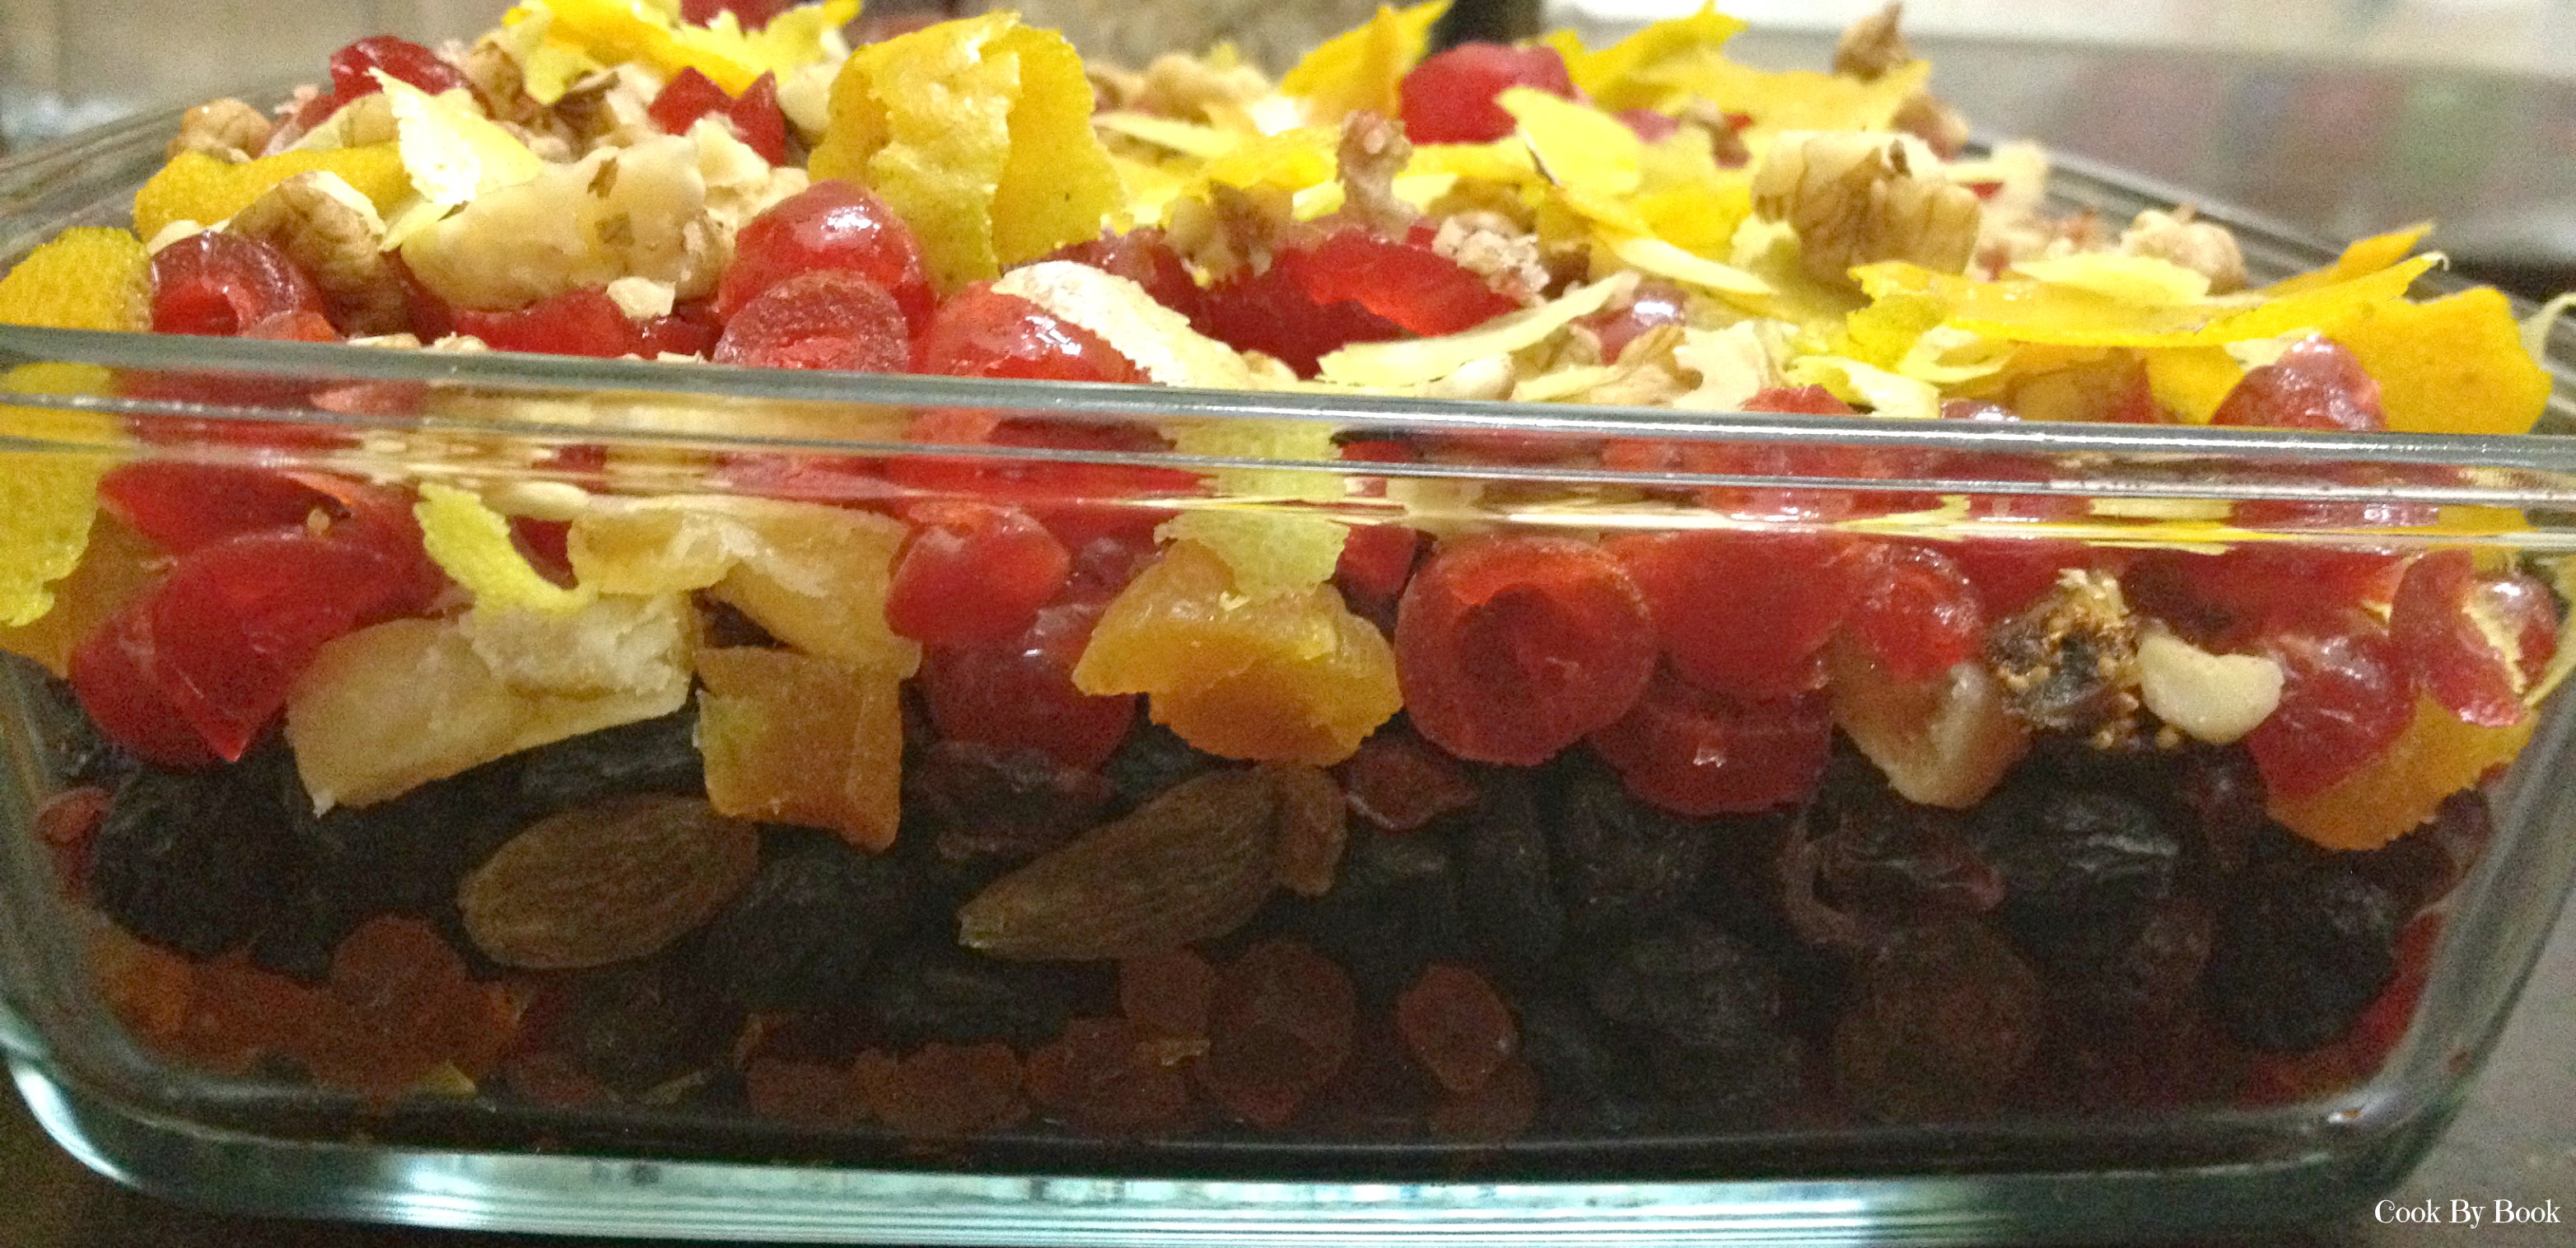
  • 7 cups chopped mixed fruits (I used assortment of raisins, sultanas, black currents, dried cranberries, dried apricots, dried pineapple, dried figs, glaced cherries, tutti frutti, orange and lemon peel)
  • 1 cup of roasted nuts (walnuts, almonds, hazelnuts, pecans or pistachio – I used walnuts and almonds)
  • 1-1.5 cups of brandy or rum

Pour the chosen liqueur over dried fruits and roasted nuts and store this mix in a glass airtight container in a cool,dry place.

Preparing Cake:

Ingredients:

  • 1 cup unsalted butter
  • 1 cup brown sugar
  • 1/2 cup honey
  • 1 cup orange juice
  • 1 tsp baking soda
  • 2 1/3 cups all purpose flour
  • 2 Tbsp milk powder (I skipped it & I don’t think it made a difference)
  • 2 Tbsp fresh orange zest
  • 1 Tbsp fresh lemon zest
  • 1 tsp ground nutmeg
  • 1 heaping tsp ground cinnamon
  • 1/4 tsp ginger powder
  • 1/4 tsp ground cloves
  • 4 large eggs, slightly beaten

Directions:

  1. Combine prepared fruit-mix (fruits+nuts+liqueur), butter, sugar, honey, orange juice and baking soda in a large saucepan. Stir over low heat until the sugar has dissolved. Bring the mixture to boil and simmer for about 5 minutes over low heat. Stir consistently. Remove the saucepan and leave to cool. Do this step a night before or few hours before making the the cake as it takes sometime for the mixture to completely cool.
  2. Preheat the oven to 150ºC/300ºF. Grease 8×4 inch loaf pan and 6-count (3×2 inch) brownie pan with butter. Set aside.
  3. In a medium bowl, sift together flour, milk powder, zests and ground spices.
  4. Gently stir in eggs to the cooled fruit mixture. Fold in the dry ingredients. Divide the mixture in to 2 parts and pour one half in loaf pan and the other half in brownie pan. Bake for about 60 minutes or until top slight cracks and is cooked.
  5. Remove the cake from the mould after letting cool for 5-10 minutes and generously brush the tops with brandy/rum. If you’re bold enough, make several holes in the cake by inserting skewer through n through at several places and pour the liqueur generously. Tightly cover with multiple layers of aluminium foil and finally with plastic wrap. Store in an airtight container. The cake tastes best eaten after a few days of aging. If you’re making weeks ahead like I did, brush the cake with brandy/rum every 6-7 days.

*Serve with a dusting of powdered sugar and decorated with glaced cherries and slivered almonds.

♥ Another great recipe I chanced upon is here. Do check it out!

Share this recipe:

Maple Snickerdoodles #fbcookieswap

Maple Snickerdoodles1

Third & final recipe of the cookie swap! These were the other two recipes if you wish to check out. My third match was Himanshu of The White Ramekins. He has such an amazing blog. Scrumptious recipes accompanies beautiful photography. His blog is a delight to see and read.

The recipe of these snickerdoodles is unbelievably simple, made with simple ingredients which I always have handy. I am sure you will too. I love everything cinnamon and these cookies fit the bill perfectly for all the cinnamon lovers! Perfect for the holiday season!

Maple Snickerdoodles2

These snickerdoodles are soft, thick and pillowy with a subtle hint of maple syrup. I like my cookies soft so I baked them for just about 10 minutes but if you don’t then extend the baking time to 13 minutes.

To be honest, they are too good to be shared. Really, they turned out so awesome that I was tempted to eat the whole batch myself and not ship them at all! Best cookies ever!! You have to have to have to make these! Believe me & add it to your holiday baking list. ☺️

Happy Christmas baking all of you!

Enjoy!

{UPDATE} 10/09/2017 : I am updating the recipe to provide whole wheat flour and eggfree option. I baked these snickerdoodles recently with these 2 substitutes for my nephew and he was a happy camper!

Maple Snickerdoodles3

Recipe inspired from Recipe Girl

Print Recipe
Maple Snickerdoodles
These maple snickerdoodles are soft, thick and pillowy with a subtle hint of maple syrup and high on cinnamon.
Course Cookies
Cuisine American
Prep Time 10 minutes
Cook Time 11 minutes
Passive Time 30-60 minutes
Servings
cookies
Ingredients
Topping
Course Cookies
Cuisine American
Prep Time 10 minutes
Cook Time 11 minutes
Passive Time 30-60 minutes
Servings
cookies
Ingredients
Topping
Instructions
  1. In a small bowl, whisk together flour, baking powder, baking soda and cinnamon. Set aside.
  2. In a bowl of your electric mixer, beat the butter until soft. Add sugar and beat until light and fluffy on a medium speed for about 1-2 minute. Beat in maple syrup and egg/flaxseed-egg.
  3. Gradually add dry ingredients to the bowl and beat at slow speed until no flour pockets remain. Let the dough chill in the refrigerator for 30 minutes to 1 hour. Do not skip this step as the dough is unmanageable at the room temperature.
  4. Preheat the oven at 180ºC / 350ºF. Line the cookie sheet with parchment paper.
  5. In a small flat dish, sieve together the topping ingredients. Take about 1 Tbsp of dough and form it into a ball between your palms. Roll the ball in the topping mixture making sure they get coated thick and even.
  6. Arrange the dough balls on cookie sheet 2-inch apart from each other and bake for 10-11 minutes. Do not overbake if you want soft cookies. The sides should be golden and center may seem soft but it will set once cooled. Bake for 2-3 minutes more if you prefer crispy cookies to soft. Let the cookies cool on a cookie sheet for 5 minutes before transferring it to a cooling rack. Once cooled completely, transfer it to an airtight container. Cookies keep fresh for about 7 days at room temperature.
Share this recipe:

Skinny Zucchini & Mushroom Soup

Skinny Zucchini & Mushroom Soup1
I am so stressed nowadays.. And the reason for all the stress is not real life.. But internet life.. I know I haven’t been posting much but I have been lurking around and appreciating what all the food bloggers are up to. All over the internet I am seeing incredibly delicious holiday food..
Christmas IS actually upon us!!! Oh my gosh! I mean where DID November go?! I mean where did the year 2013 go? I am still trying to wrap my mind around this reality and meanwhile December is already slipping away at a lightening speed. Looks like everyone is ready for it but me. Web is getting bombarded with countless uhh-mah-zing fudge and truffle recipes. Peppermint and chocolate is in the air! Red and green are ruling! And all I have got to post today is SOUP!
I mean don’t get me wrong… I totally adore soup! The temperature is fluctuating constantly around here so it is perfect for the season! This light and skinny soup is so easy to make just like all the other recipes I post over here. One pot meal = happiness!
I know zucchini season is over for most of you out there but we’re still getting enough of it here. Pair it with earthy mushrooms and you get a thick, silky, creamy consistency soup without even adding any cream to it. Thyme lends a beautiful depth of flavor. And another advantage is that no vegetable stock is required for this soup! Yes!! Water works just fine & you won’t even miss the stock.. win-win 🙂
Give me a mug of this cozy soup with garlic bread and I am in heaven!
Skinny Zucchini & Mushroom Soup2
Skinny Zucchini & Mushroom Soup
Serves: 3 | Prep time: 5 minutes | Cooking time: 15-20 minutes | Total time: Under 30 minutes
Ingredients:

  • 1 Tbsp margarine (Olive oil can be substituted)
  • 1 medium onion, chopped
  • 2 garlic cloves, crushed
  • 300 gm (2 small) zucchini, roughly chopped
  • 200 gm / 7 oz mushrooms, roughly chopped
  • Few sprigs of fresh thyme
  • Salt and pepper, to taste
  • 2 cups water

Directions:

  1. Heat the skillet on a medium heat and add margarine to it. Sautè onions and garlic cloves on a low heat till pink and translucent.
  2. Add zucchini, mushroom and thyme sprigs to the skillet and sautè till cooked for 10 minutes. Add 1 cup of water to it and let it boil. Turn off the heat.
  3. Remove the thyme sprigs and puree using a hand blender/food processor. Add this puree and another cup of water to skillet and let it come to boil. Season with salt and pepper. Adjust the consistency of the soup by adding more water if needed. Serve hot!

*Serve it with shredded Parmesan for a cheesy kick!

Share this recipe:

Baked Chocolate Banana Doughnuts ~ Low-fat & Egg-free!

Baked Chocolate Banana Doughnuts1


I pretty much say this about the every recipe I post here but these are the BEST thing ever ever baked in my kitchen! At least so Mr claimed!

These are so moist, soft and super-pillowy. Banana and chocolate heaven in each bite! These baked doughnuts will truly rock your world I tell ya! People with diet-restrictions, this recipe is a MUST in your repertoire!! Such a result without eggs and whole wheat flour… Amazing!

Baked Chocolate Banana Doughnuts3


Baked Chocolate Banana Doughnuts2


And these beauties are then topped with ganache.. A white chocolate ganache.. slurp… It is so gorgeous and I am telling you that this ganache is a MUST for these donuts! I mean who eats a naked donut, right?!!! And then the sprinkles which truly are a NECESSITY! 😀

I shall not endorse it anymore but you gotta try it to believe it! 🙂

Baked Chocolate Banana Doughnuts

Yields: 8 doughnuts

Ingredients:

  • 2/3 cup whole wheat flour
  • 3 Tbsp Hershey’s unsweetened cocoa powder
  • 1 tsp baking soda
  • 1/4 tsp salt
  • 1/4 cup unsalted butter, melted
  • 1/3 cup + 1 Tbsp brown sugar
  • 1 cup mashed very ripe bananas (about 2 medium bananas)
  • 4 Tbsp yogurt
  • 1 tsp vanilla extract

For Ganache:

  • 2 Tbsp medium-fat cream/milk
  • 4 oz white chocolate, coarsely chopped
  • sprinkles, optional

Directions:

  1. Preheat the oven at 180ºC/350ºF. Grease doughnut pan with baking spray. Set aside
  2. Sift together flour, cocoa powder, baking soda and salt in a bowl. Set aside.
  3. In a medium sized bowl, whisk together melted butter and brown sugar. Whisk in mashed banana, yogurt and vanilla extract.
  4. Slowly fold in dry ingredients into wet ingredients. Divide the batter equally and fill the mold no more than 3/4th. Bake for 11-12 minutes. Cool in pan on a cooling rack for 5 minutes. Then carefully turn out doughnuts directly onto rack to cool.
  5. Preparing ganache: In a microwave safe bowl, heat the cream for 40-60 seconds. Fold in chopped white chocolate and mix till it melts completely. Dip cooled doughnuts one by one into bowl of ganache and place back on a cooling rack. Top with sprinkles and serve. Doughnuts will keep in an airtight container for 2-3 days.

*In ganache reccipe, white chocolate may be substituted with dark chocolate.

Share this recipe:

Healthy Chocolate Beetroot Bundt Cake

Healthy Chocolate Beetroot Cake2

I baked 3 batches of cookies this Monday to be sent for the cookie swap I am participating in. I wanted to do this precisely on a weekday so that I can courier the cookies on the same evening and they reach their destination in another 2 days, when they can be still considered FRESH! Good news is that one shipment was delivered yesterday and the other 2 were out for delivery today morning… Success! The bad news is I can’t share those cookie recipes with you… Not yet 🙁

So to celebrate, I am sharing this awesome chocolate bundt with you all today. And as you must have guessed already, it is undoubtedly a healthy recipe! This time I have experimented with beetroot purée and liquid jaggery. I was feeling quite proud of myself while presenting this cake in front of Mr and some guests as the experiment turned out a total success! Nobody could guess/taste the secret ingredients… Even the kids!! 😀

Healthy Chocolate Beetroot Cake1

This cake is supremely moist because of puréed beetroot and olive oil. Liquid jaggery lends most of the sweetness and the brown sugar with chocolate lends works beautifully with chocolate. The taste is rich and exceptionally chocolaty. A top performer in my opinion!

The batter is a simple 1-bowl creation which comes together easily and can be prepared even without electric mixer. It bakes fairly quickly compared to any other bundt cakes. After the cake cools completely, simply pour ganache over it and serve a giant, thick slice of your masterpiece!

Healthy Chocolate Beetroot Cake3

If you fear the bundt pan, let me give you a tip on ‘How-To’. Generously grease the pan with butter and lightly dust it with flour. This is a foolproof way and the cake will not stick to the pan or break in pieces when you invert it on a cooling rack. So spend some time on this step before you start with the cake batter. After the cake bakes, let it cool in pan for 15-20 minutes before trying to release it from the pan. Perfection! So let go of your fear of bundt pan and whip up this decadent deliciousness NOW!

Healthy Chocolate Beetroot Bundt Cake with Dark Chocolate Ganache

Serves: 12 | Prep time: 20 minutes | Bake time: 35 minutes approximately

Ingredients:

Dry ingredients:

  • 2 cups whole wheat flour
  • 3/4 cup +1 Tbsp Hershey’s unsweetened cocoa powder
  • 1 tsp cinnamon powder
  • 2 tsp baking powder
  • 1 tsp baking soda
  • 1 tsp salt

Wet ingredients:

  • 1/3 cup extra-virgin olive oil
  • 1/4 cup brown sugar
  • 3/4 cup liquid jaggery
  • 3 large eggs
  • 1/3 cup plain yogurt
  • 1 + 2/3 cup beetroot purée, (around 4 medium beetroots boiled, peeled and puréed)
  • 1 Tbsp vanilla extract

Ganache:

  • 2 Tbsp medium fat cream/milk
  • 3 oz dark chocolate, roughly chopped

Directions:

  1. Preheat the oven at 190 C/375 F. Grease a bundt pan nicely with butter and dust it with flour.
  2. In a medium bowl, sift together all the dry ingredients.
  3. In a bowl of your electric mixer, fitted with paddle attachment, add olive oil and brown sugar and beat on a low speed. Add liquid jaggery and continue to beat.
  4. Increase the speed to medium-high, add one egg at a time and beat for 2 minutes after each addition. Beat in yogurt.
  5. Slowly add beetroot purée and dry ingredients in 2 additions, ending with dry ingredients. Scrape the sides of the bowl with spatula and beat until just combined. Do not over-mix the batter.
  6. Pour the batter to the prepared bundt pan and bake for 33-35 minutes. Toothpick inserted near the centre of the pan should come out clean or just with few moist crumbs. Let the cake cool in a pan for 15-20 minutes before inverting on a wire rack.
  7. Heat a small sauce pan and add cream/milk to it. Once the cream/milk is hot(not bubbling), remove it from heat. Add chocolate to it and stir continuously until chocolate has melted completely. Pour the ganache over the cake. Cut a thick slice and serve.

*Store the cake in an airtight container. Stays fresh on a counter for 1 day and in refrigerator for 5-6 days.
*The cake is enough sweet for me but in case you like your baked products quite sweet then increase the quantity of brown sugar in the batter as per your taste. Lick, taste and then proceed! 😉

Still scared of a bundt? Try these delicious cupcakes!
Happy Baking! xx

Share this recipe: